

iOS SDK Integration
Before you startMake sure you've obtained a token, server URL, and auth key from credolab Customer Success Manager.
The minimal iOS deployment target version is 11. For CredoAppIovation the minimum required iOS version is 15.
The programming language is Swift.
1. Declare dependencies
CocoaPods
See this page for details on installing CocoaPods and creating your first pod file if you haven't already.
Now, modify your pod file
source 'https://token:[email protected]/basic/credolab/proxyen-sdk/cocoapods/index.git'
target 'YourApplication' do
  pod 'CredoAppCore', 'X.Y.Z'
  pod 'CredoAppCalendarEvents', 'X.Y.Z'
  pod 'CredoAppCalendarReminders', 'X.Y.Z'
  pod 'CredoAppContacts', 'X.Y.Z'
  pod 'CredoAppMusic', 'X.Y.Z'
  pod 'CredoAppMedia', 'X.Y.Z'
  pod 'CredoAppApplication', 'X.Y.Z'
  pod 'CredoAppBehavioral', 'X.Y.Z'
  pod 'CredoAppLocation', 'X.Y.Z'
  pod 'CredoAppTelephony', 'X.Y.Z'

  # Include only if the app has access to IDFA (MAID)
  pod 'CredoAppMaid', 'X.Y.Z'

  # Optional: if you want to use logging plugin
  pod 'CredoAppLogging', 'X.Y.Z'
  pod 'Sentry', :git => 'https://github.com/getsentry/sentry-cocoa.git', :tag => '9.2.0'
End
NotePlease, replace X.Y.Z with module versions from SDK Versions page.
The final result should look like this:pod 'CredoAppModule', '1.0.0'
Once added, the cocoa pods tool will download the dependency to the Pods directory in your project and update the Podfile.lock after running the following command:
pod installSwift Package Manager (SPM)
See this page for details about SPM
- Create a new Swift package by running the following command if it doesn't already exist
mkdir CredoAppPackage && cd CredoAppPackage && swift package init --type library - Set registry for the project by running the following command in the terminal
swift package-registry set https://swift.cloudsmith.io/credolab/proxyen-sdk/ --scope credolab
NoteThis command is used to assign registry at user-level
swift package-registry set https://swift.cloudsmith.io/credolab/proxyen-sdk/ --scope credolab --global
- Login to private Credolab Swift registry by executing the following command in the terminal
swift package-registry login https://swift.cloudsmith.io/credolab/proxyen-sdk/ --token $TOKEN
NoteReplace $TOKEN placeholder with the token provided by the Credolab team
Setting Up Dependencies
A package dependency is defined in the Package.swift file. To update the dependencies used in your project, open the Package.swift file located in your application's project folder.
In the dependencies section of Package.swift, add the desired modules by specifying their identifiers and versions. The identifier consists of the scope and package name, separated by a period. Refer to the code example below:
// swift-tools-version: 5.10
// The swift-tools-version declares the minimum version of Swift required to build this package.
import PackageDescription

let package = Package(
    name: "CredoAppPackage",
    products: [
        .library(
            name: "CredoAppPackage",
            targets: ["CredoAppPackage"]),
    ],
    dependencies: [
                .package(id: "credolab.CredoAppCore", exact: "X.Y.Z"),
                .package(id: "credolab.CredoAppIovation", exact: "X.Y.Z"),
                .package(id: "credolab.CredoAppMusic", exact: "X.Y.Z"),
                .package(id: "credolab.CredoAppCalendarReminders", exact: "X.Y.Z"),
                .package(id: "credolab.CredoAppCalendarEvents", exact: "X.Y.Z"),
                .package(id: "credolab.CredoAppMedia", exact: "X.Y.Z"),
                .package(id: "credolab.CredoAppBehavioral", exact: "X.Y.Z"),
                .package(id: "credolab.CredoAppApplication", exact: "X.Y.Z"),
                .package(id: "credolab.FraudForce", exact: "X.Y.Z"),
                .package(id: "credolab.CredoAppContacts", exact: "X.Y.Z"),
                .package(id: "credolab.CredoAppLocation", exact: "X.Y.Z"),
                .package(id: "credolab.CredoAppTelephony", exact: "X.Y.Z"),
                .package(id: "credolab.CredoAppMaid", exact: "X.Y.Z")

    ],
    targets: [
        .target(
            name: "CredoAppPackage", dependencies: [
                .product(name: "CredoAppCore", package: "credolab.CredoAppCore"),
                .product(name: "CredoAppIovation", package: "credolab.CredoAppIovation"),
                .product(name: "FraudForce", package: "credolab.FraudForce"),
                .product(name: "CredoAppMusic", package: "credolab.CredoAppMusic"),
                .product(name: "CredoAppContacts", package: "credolab.CredoAppContacts"),
                .product(name: "CredoAppCalendarReminders", package: "credolab.CredoAppCalendarReminders"),
                .product(name: "CredoAppCalendarEvents", package: "credolab.CredoAppCalendarEvents"),
                .product(name: "CredoAppMedia", package: "credolab.CredoAppMedia"),
                .product(name: "CredoAppBehavioral", package: "credolab.CredoAppBehavioral"),
                .product(name: "CredoAppApplication", package: "credolab.CredoAppApplication"),
                .product(name: "CredoAppLocation", package: "credolab.CredoAppLocation"),
                .product(name: "CredoAppTelephony", package: "credolab.CredoAppTelephony"),
                .product(name: "CredoAppMaid", package: "credolab.CredoAppMaid")

            ]),
    ]
)
NotePlease, replace X.Y.Z with module versions from SDK Versions page.
CredoAppLoggingplugin is not available via SPM
Resolving Dependencies
- Clear Build Products and Cache (Optional)
swift package reset swift package purge-cache - Resolve dependencies:
swift package resolve
Integrate the package into an Xcode project (Optional: Only necessary if package has not been integrated previously)
- To integrate package into Xcode project using Swift Package Manager (SPM), open your App in Xcode and open File >
Add Package Dependencies.... Click onAdd Local...button and select the package
2) Declare permissions
Please declare permissions according to the "permissions" in Optional Modules section
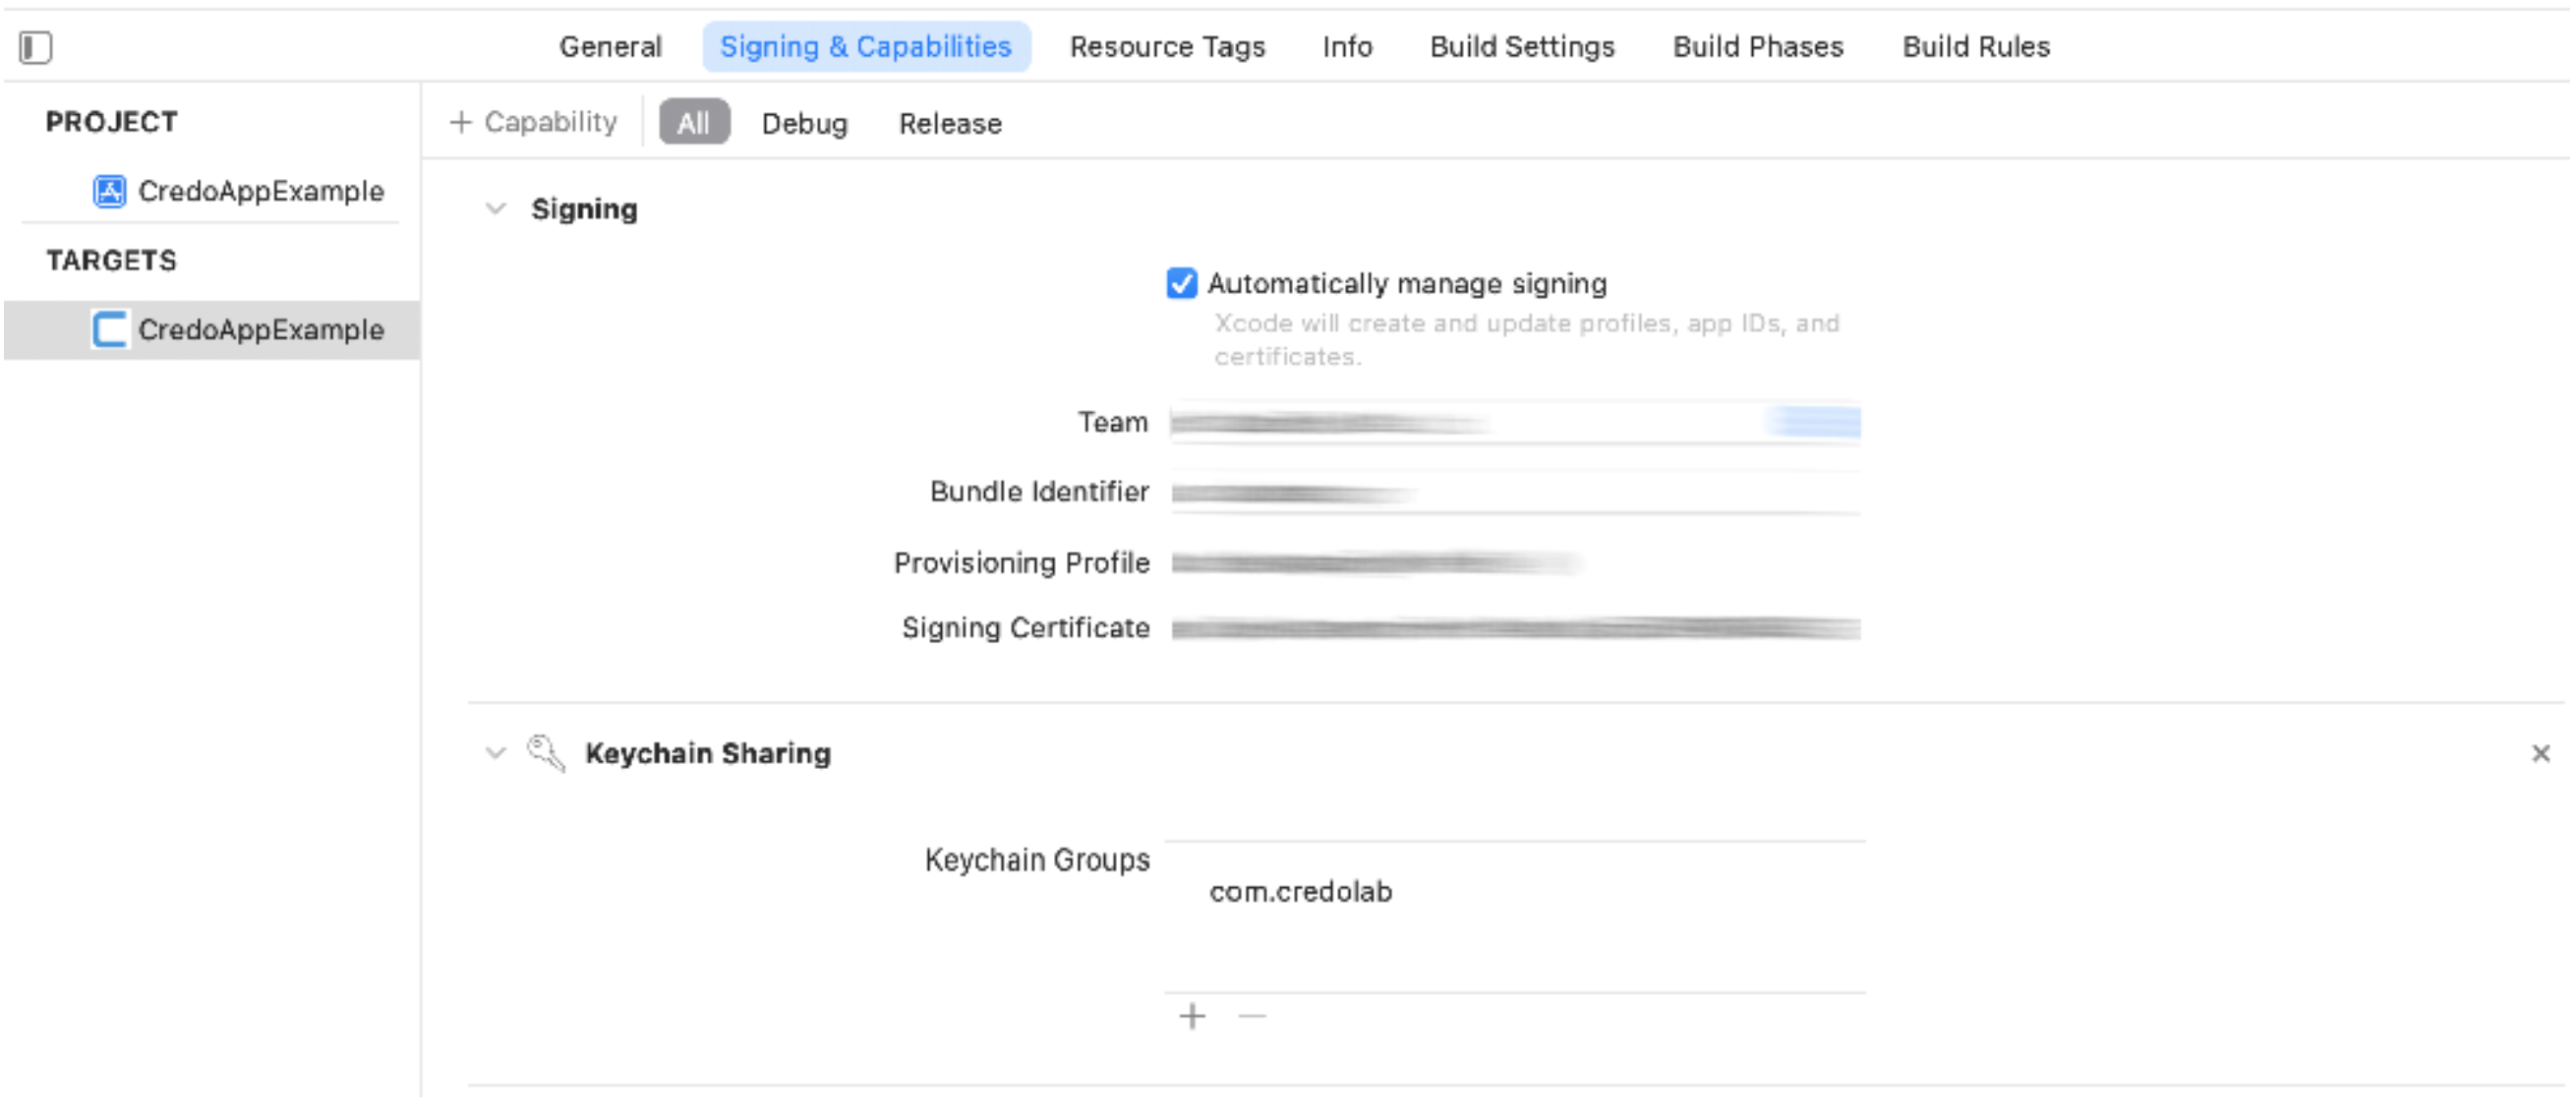
Enable "Keychain Sharing"
To enable sharing the Device ID across apps and ensure it survives app reinstalls, we recommend additionally configuring "Keychain Sharing" in the app.
-
Add
com.credolabto its list of Keychain Groups:
-
Check that added value is reflected in the entitlements file:
$(AppIdentifierPrefix)com.credolab
-
Add the key
AppIdentifierPrefixwith the string value$(AppIdentifierPrefix)to your app'sInfo.plist
3) Build and use CredoAppService
To start, you need to add the following snippet to your code
import CredoAppCore
import CredoAppMusic
import CredoAppContacts
import CredoAppCalendarReminders
import CredoAppCalendarEvents
import CredoAppMedia
import CredoAppBehavioral
import CredoAppLogging
import CredoAppApplication
import CredoAppLocation
import CredoAppTelephony
// Include only if the app has access to IDFA (MAID)
import CredoAppMaid
// if you use BehavioralModule
// credolab recommends to use logging in behavioral module
BehavioralModule.setLogger(plugin: LoggingPlugin())
// run can tracking in any place in your code
BehavioralModule.startTracking()

let credoAppService = CredoAppService.Builder()
    .addModule(BehavioralModule())
    .addModule(CalendarEventsModule())
    .addModule(CalendarRemindersModule())
    .addModule(ContactsModule())
    .addModule(MediaModule())
    .addModule(MusicModule())
    .addModule(ApplicationModule())
    .addModule(LocationModule())
    .addModule(TelephonyModule())
    // Include only if the app has access to IDFA (MAID)
    .addModule(CredoAppMaid())
    .addPlugin(LoggingPlugin())
    .build()

// stop tracking on a particular screen or app condition
BehavioralModule.stopTracking()
NotePlease refer to
BehavioralModulesection for additional information about module integration.
Maid module
If
CredoAppMaidis used:
- Add
AppTrackingTransparency.frameworkandAdSupport.frameworkto the Frameworks, Libraries, and Embedded Content section your project- Ensure that tracking authorization is requested before starting the data collection process by calling
ATTrackingManager.requestTrackingAuthorization
Application module
To integarte
CredoAppApplicationmodule, the initial step involves adding URL Schemas into theInfo.plistfile within your project (maximum 50 schemas are allowed).Below is a list of common app schemas along with a detailed guide on how to declare them in the
Info.plistfile.
Now, use the service
	let credoAppResult = credoAppService.collect()

	switch credoAppResult {
		case .success(let value):
			log(value)

		case .error(let errorCode, let errorMsg):
			log("Err: \(Date().timeIntervalSince1970); code - \(errorCode); msg - \(errorMsg);")
	}
NoteRemember that you always must call
collectmethod on a background threadDispatchQueue.global(qos: .background).async.If
collectmethod is successful then dataset is returned.
Behavioral data is cleared oncollect()method callOnce
collect()method is calledBehavioralModuleclears its data stored on user the device.Thus, for data consistency, our strong recommendation is to call the method only once: at the end of the user flow.
4. Upload from an iOS Device (Testing purposes only)
Direct Upload Note:In a production environment, datasets should only be uploaded via your organization's proxy server.
For testing, integration, or generating insights, you may use the following code snippet:
If you have any further questions, please do not hesitate to contact us.
Video Tutorials
Core Module Integration Tutorial
Optional Modules Integration Tutorial
Behavioral Module Integration Tutorial
Next Steps
After successfully integrating our SDK, it is recommended to proceed with the following steps to utilise our platform effectively:
- Setting up your Reverse Proxy
- Uploading your Dataset. Once the server is configured, you can upload your dataset using the server address.
- Collecting your Dataset Insight or TruValidate(formerly known as iovation) Fraud Check. With the dataset uploaded, you can now get insights or perform TruValidate Fraud Checks to assess risk based on the device and transaction details provided.
Updated 4 months ago